 You need a fair amount of equipment to make mead. A five gallon class carboy, plastic tubing, a funnel, honey, yeast, clean water, an airlock, drilled stoppers, and so forth. Fortunately, most of these things are "durable goods" that you can use over and over in your brewing and vinting hobby. You actually need more than one carboy, since you'll need to "rack" periodically, but that's an issue for another post (we'll need to rack this in a month or two).
Stage one of the process is to clean and sterilize all of the equipment that will touch the "must" or unfermented honey-water mix. A contaminated must produces five gallons of extraordinarily expensive vinegar, so be clean. We sterilize with a bleach water solution, then rinse thoroughly.
As you might guess from the picture, we don't particularly like to use the water from our tap. We have a really high chlorine content here, and yeast don't like that. Besides, it just doesn't taste all that good. If we had a really good water filtration system, we might use our local water, but until we get that, we just buy inexpensive "spring water" at the grocery.
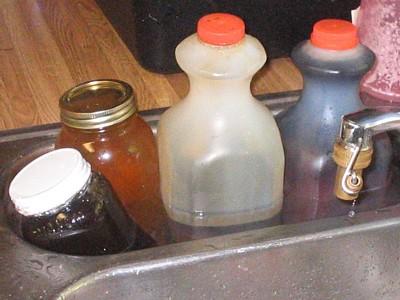 We used roughly fifteen pounds of honey for this project. If you've ever tried to pour honey, you know just how slow and tedious a process it can be. Fjorleif's solution is to run a hot bath for the honey containers so it will run relatively easily when you're ready to pour it into the carboy.
Incidentally, that widget you see on the faucet is a bottle washer. It's basically a stem with a valve that jets water up into the bottle when you press the bottle down on to the little lever. This makes washing and rinsing bottles and carboys SO much easier. If you're going to make wine, you definitely want one.
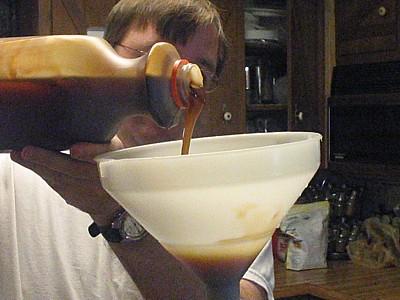 Now that we've got our clean carboy, it's time to pour in the honey. Keep your water supply handy. There will be honey residue in the container; why waste it? Just pour some water into the container, recap it, shake it good to get the honey mixed into the water, and pour it into the carboy with the rest of the honey. No fuss required.
Notice that the honey goes in first, so that when you add the bulk of the water, it will rinse the honey residue out of the funnel. No wasting honey for us.
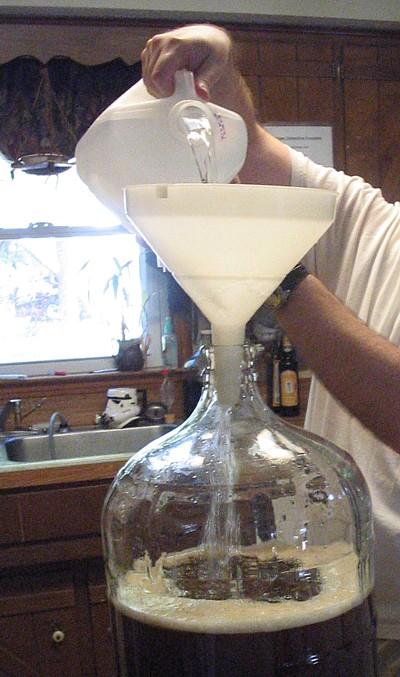 With all the honey in the carboy, it's time to add the water. Depending on your recipe and mead-guru, you may also want to add gypsum, acid, yeast nutrients, or some other additives. You'll probably be working with wine yeast, which prefers grape juice to diluted honey. Adding yeast nutrients and adjusting the acid balance may increase the speed of your fermentation. A quick fermentation isn't really important to us, so we decided to just let the yeast adapt and figure out how to do without those things in this batch. If we were exceedingly conscientious, we would try to capture some of the yeast dregs from this batch for our next one, so as to breed yeast specifically for mead fermentation. As you might guess, we're not that conscientious; preserving yeast is a rather tedious process which we have not attempted -- dehydrated, packaged yeast being so easy to obtain. Heck, if we were conscientious, we would also have tested and recorded the specific gravity (sugar density) of the batch at this point, but we just plain forgot.
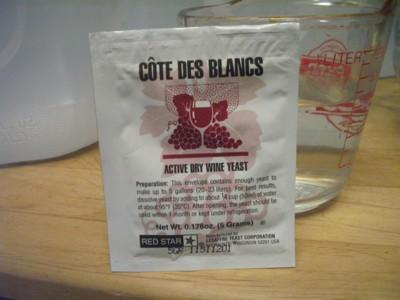 With the carboy filled, it's time to add the yeast. Cote des Blancs is supposedly a pretty robust variety of yeast that can do well for mead-making without stripping out the floral character of the honey. You rehydrate the yeast in water and then add it to the must. As you might know from reading my previous article, the Cote des Blancs actually didn't do so well. In fact, it didn't seem to be doing anything. Therefore, Fjorleif added some Premier Cuvee wine yeast the next morning. Premier Cuvee is a somewhat more vigorous yeast used to restart "stuck" fermentations, among other things.
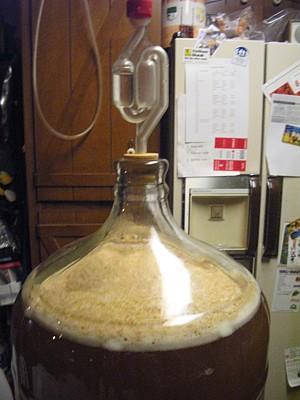 Adding the Premier Cuvee got a swift reaction. Maybe the Cote des Blancs was just waiting for some "fertilizer" to help it along, and it fed on the incoming Premier Cuvee. Maybe the opposite occurred. Maybe the Cote des Blancs was a bad batch and the Premier Cuvee was good. It matters little why; it's the result that's important. In mere moments the mead must started bubbling vigorously. The image at left shows the state of the mead after it's been fermenting for several hours.
Making wine and mead is a wonderful hobby because it's not labor intensive. Now that this batch of mead is started, we can stick it in the closet and ignore it for a month or more. We can also start a batch of something else in between, staggering the times when we actually need to do something with the fermenting products.
That brings us to the end of the beginning for this batch of mead. Tune back in a few months when we perform the first racking.

1 comment:
looks good so far -- you've got the technique down ...
hope you don't get a stuck fermentation ...
however, as for cotes de blancs ... i haven't had a whole lot of luck with it ... it tends to peter out early and leave me a very sweet mead, which I then have to mix with another batch of ultra-dry to even out the blend.
drop me a line, and we can compare, if you'd like ...
his.kyness @ gmail.com
I was (once upon a time) with the Barony of Thor's Mountain
Post a Comment